 |
| My DIY Arcade Table Coffee Table running MAME. |
So it's been a just over a month since I finished my Arcade Table Coffee Table, so thought I'd post some progress pics of the personal project I've been wanting to do for years.
Being a stay at home dad working from home looking after 2 cheeky monkeys (my 2 gorgeous girls), I find it hard to do any serious gaming, so always loved old skool arcade games for the quick 'jump in/jump out' gaming. So wanted to build a MAME cabinet, but have no room nor have approval from the wifey to embark on the project, so it just sat there in the back of my mind.
Then I saw this...
 |
| Double7 Arcade Table by Surface Tension |
It is the
Double7 Arcade Table by Surface Tension, and I thought it was a really nice design and even wifey thought it looked great, so the plan was hatched to build something similar as a DIY project as I didn't think it was worth the £2,799.00 GBP sticker shock price tag for it. Not being a woodworking expert, I spent a month just researching what I had to do, and then also had an idea to use stuff sourced from IKEA to hack something together, but it never went beyond a few conceptual sketches and links to items on IKEA.
Then about 6 weeks ago, IKEA was having a sale before the end of financial year and saw a BESTÅ Bench on sale for $25 down from $95 so thought what the heck, if I mess it up, it's only $25... Then saw these
INREDA drawers on sale for $5 each!
So started the process over a couple of weeks to bring my plan into fruition.
Update: Wow, found out this is
featured on IKEA Hackers! Thanks Jules! :)
Progress pics as follows:
 |
| IKEA parts ready for hacking! |
 |
| Assembled BESTÅ Bench and drawer rails test fitted |
 |
| Test fitting drawers the 'intended' way according to the IKEA instructions |
 |
| Test fitting drawers flipped around, to provide clearance at rear for internal parts |
 |
| Eye balling donor LCD monitor for location |
 |
| Measuring out where the LCD monitor would be |
 |
| Little know fact: These BESTÅ Benches have a hollow paper honeycomb structure, so all that is required for cutting a hole in the top is a craft knife! |
 |
| Cutting the underside to match |
 |
| One hole large enough to fit an LCD monitor... Check! |
 |
| Using the off cuts from the top panel to build a frame for the hole for the LCD monitor |
 |
| Framed hole in table |
 |
| Test fitting LCD monitor, note it's different from the donor one above. Wifey mentioned she needed an LCD monitor so I bought a thinner LED monitor, at a really good price. |
 |
| Not quite flush with top of table, so will need to cut the middle supporting beam to lower the monitor. |
 |
| Area marked out for cutting, and true to the adage 'Measure twice, cut once' I did mess up the measuring numerous times but thankfully double and triple checking helped. |
 |
| Middle support beam cut ready for monitor to be fitted |
 |
| 1 UP button |
 |
| Stick of Joy! |
 |
| The controls will be mounted on a hinged panel at the top of the drawers, so that the joystick can be dropped down to give enough clearance to close the drawers, hiding the controls when the arcade table is pretending to be a coffee table. :) |
 |
| Looks about right, but really hope I did my calculations right... O_o |
 |
| 1 mm clearance... phew! |
 |
| Controls when drawer is extended, holes are marked out for where the arcade buttons are going to be |
 |
| Controls in their final layout, should be flexible enough for most games |
 |
| Underside of the controls, wired up to the keyboard encoder which just shows up as a USB joystick device in Windows |
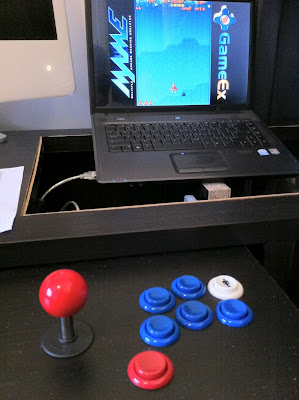 |
| Testing out the controls hooked up to the donor laptop |
 |
| Ms 7 helping me beta test the incomplete setup... :) |
 |
| 2nd drawer of controls completed! |
 |
| It's alive! And running Windows 8 Consumer Preview... *shudders* #AppleFanBoi :) |
 |
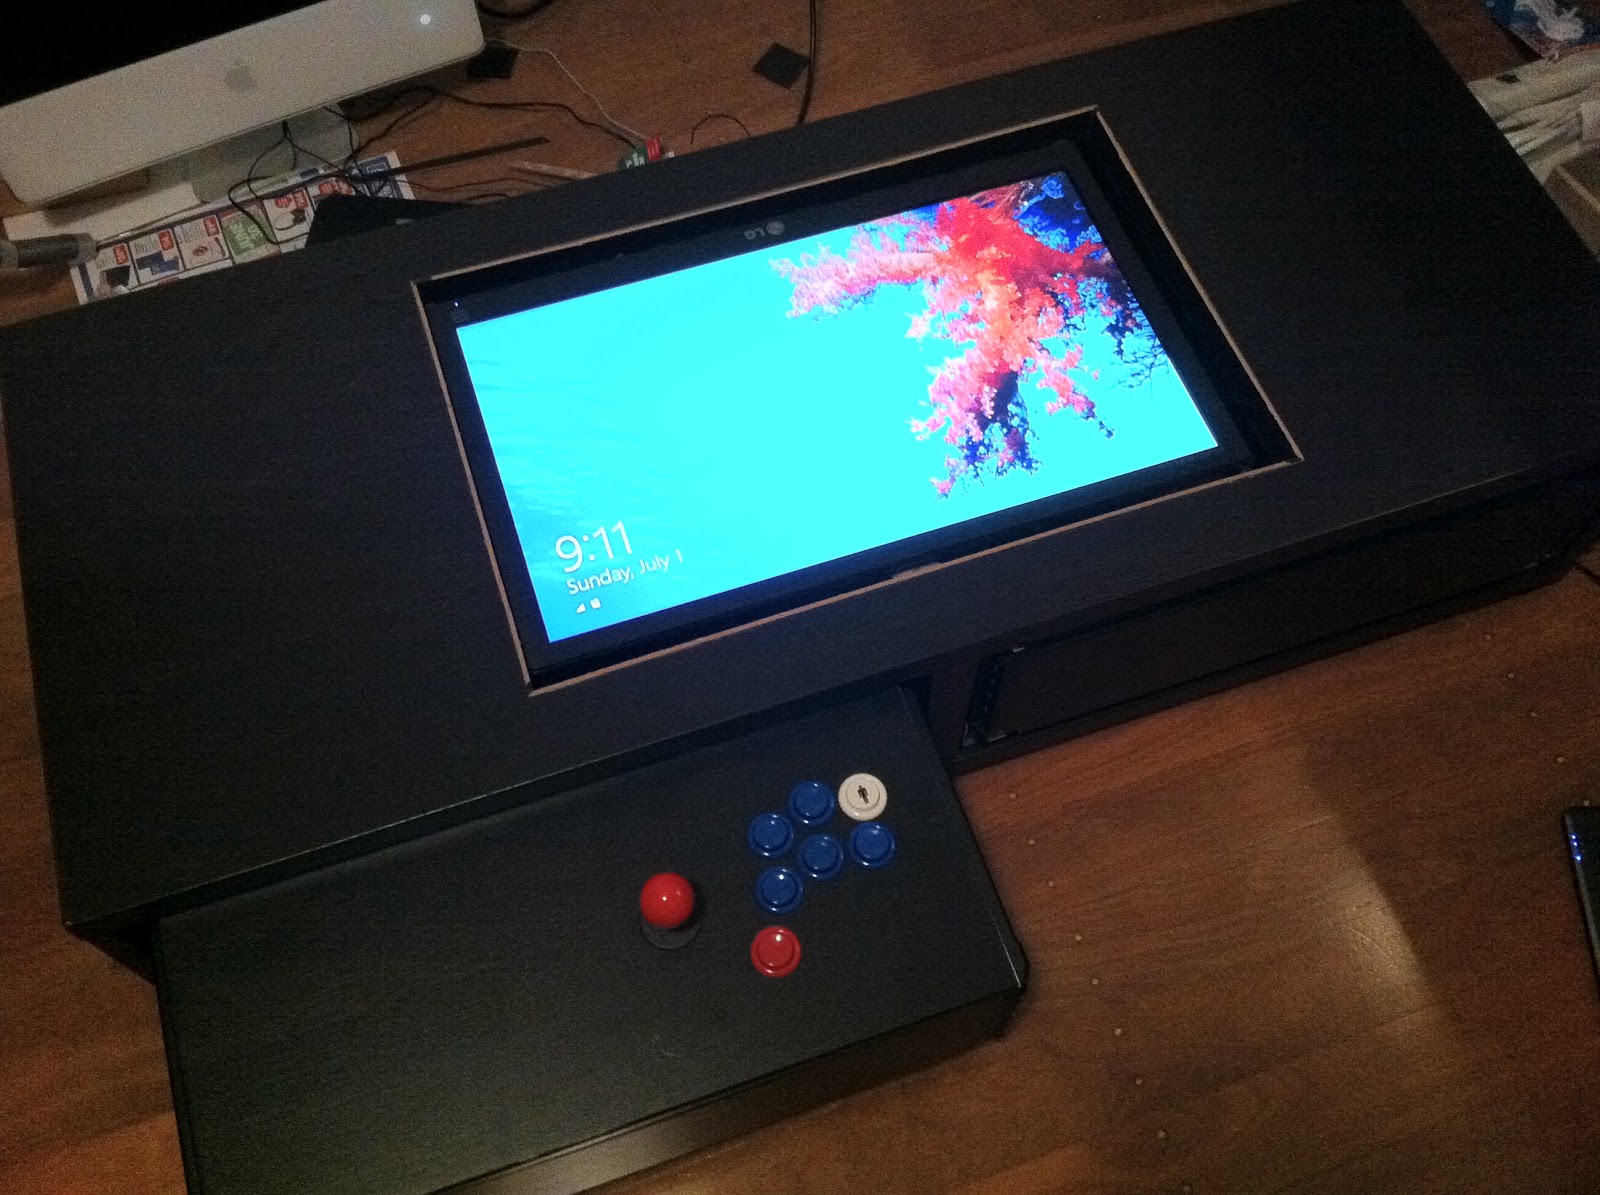
| Arcade table closed up, just needs some final spit and polish and the glass table top |
 |
| Arcade control drawers extended |
 |
| Wiring mostly secured and tied down, frame for hole at the top of the table painted and glued on. Sticky tape to hold it in place while it dries. |
 |
| Sticky tape removed, almost ready for monitor to be mounted and glass table top |
 |
| Monitor mounted with glass table top on. Added some 2.1 speakers with speakers sitting on top (might mount these to the underside of the table. Sub woofer is mounted internally on the left, just clearing the drawers on the left. Bubble Bobble is the game shown. |
 |
| Another shot, this time Raiden! :) |
|
| Pac Man! Waka waka waka waka! :) |
 |
| Money shot... this makes the wife happy as it just sits there looking like a coffee table, waiting for the times that I get bored and fire it up for some quick old skool gaming... :) |


23 Comments:
Nicely done.
Fun looking at the 'how you did it'-pics after seeing it on ikeahackers.
Nice hack!
Hey swang, this is an amazing piece of creativity and work. Would you consider making one for sale?.. Please send me an email to ssergey2002 (at) Yahoo, if you are interested. Thanks!
Curious about the hinged control panels... Care to post photos (or even better, a video !) of it in action ?
Great work :)
Where did you get the USB keyboard encoders? Thanks.
nice one ! the hacking of the ikea stuff i would manage... but the electronic part is ... well overwelming for me...
where do you get keyboard encoder and those arcade buttons ? izsn at hotmail dot com
Very nice!
One suggestion - put some light tint film on the glass and it will hide the LCD parts and logo from view. The light from the LED will only be attenuated by one pass through the film, but the visibility of the LCD parts will be attenuated 2x (light coming in to the parts, and reflected light coming back out to your eyes).
awesome. just, awesome. i finally know what i was initially intending with my Rockford Fosgate tabletop. now i just need to do another run to Ikea
aws0me stuff!
I've built a 4 player machine out of an Ikea table as well!
https://lh3.googleusercontent.com/-bfoCBCb9dzE/UAX3hwHxq_I/AAAAAAAABio/6h9ZYMkgslQ/s636/IMG_20120717_210559.jpg
You spelt School wrong.
Nice arcade unit!
I bought my parts from Gremlin Solutions You'll find the PCB bits here, I'm using the Cthulhu PCB just for the ease of use and the amount of flexibility it has with connecting to other consoles etc...
Here's another setup I built using an old pc and table.
The Arcade Project
i wanna try this with ps3...any suggestions on wiring controllers to look old skool?...anyone?
i wanna try this with ps3...any suggestions on wiring controllers to look old skool?...anyone?
Do you know what models, or have a better description of the Ikea parts?
Dfd
I bought my parts from Gremlin Solutions You'll find the PCB bits here, I'm using the Cthulhu PCB just for the ease of use and the amount of flexibility it has with connecting to other consoles etc...
Here's another setup I built using an old pc and table.
coffee table
THis is epic! Always wanted to do this, seeing this makes it seem doable. Got know idea about electronics guess ill get my electrician mate to help me there!
NICE WORK!
Can you explain me, how does the joystick get supported by the hinged panel? Cuz Im trying to do it but well.. Im definitely doing something wrong since I have no idea how to lock them on top, but they do drop and are able to be store inside the drawers.
I know this post is old so I don't know if you'll reply but worth a shot anyways! I'm going to build this (though at a very expensive price sadly... around 30-40 bucks for your coffee table, the price now is well over 200 if i buy the BESTA bench with drawers) and if I might ask, what monitor is that? The LG one? Thank's if you do reply!
Hey, I had a great time reading your website. That's is a nice project. Do you have an email address that I can contact you on? Thank you and hope to hear from you soon.
Regards,
Joel
JHouston791 gmail.com
would you make one of these to sell? it is awesome!
you can email me at sallytrotter@y7mail.com
cheers :>>
My DIY Arcade Machine Coffee Table ... pacmanmachine.blogspot.com
What an awesome idea! You're amazing! ^^
Post a Comment
<< Home